
This Is My Swamp
In this article, I describe a very simple way of using Git, ideal for beginners working by themselves in personal projects.
The concepts explained in this article can be summarized in the following points:
- Creating the repository with the GitHub web app,
README.mdincluded. - Cloning repository with
git clone <url> . - Adding all files with
git add . - One-line commit messages with
git commit -m "<message>" - Pushing to master/main with
git push origin masterorgit push origin main
In truth, Git is especially powerful to work collaboratively, and the approach explained in this article is suitable only for working by yourself. Then why write an article about it? Because to get good at Git, we need to start somewhere. The approach I describe here can be used as your first workflow.
In the future, I will try to release more articles explaining good practices for working collaboratively. I just hope that this simple explanation allows you to have your coding projects in Git repositories instead of random folders on your computer.
The “This is my Swamp” part of the article title is in honour of Shreck movie first scene. Let’s get started, and start coding as if we were alone in our Swamp.
Creating the Repository
In this guide, we will be using GitHub. The steps will be similar if you use a different service like Bitbucket or Gitlab.
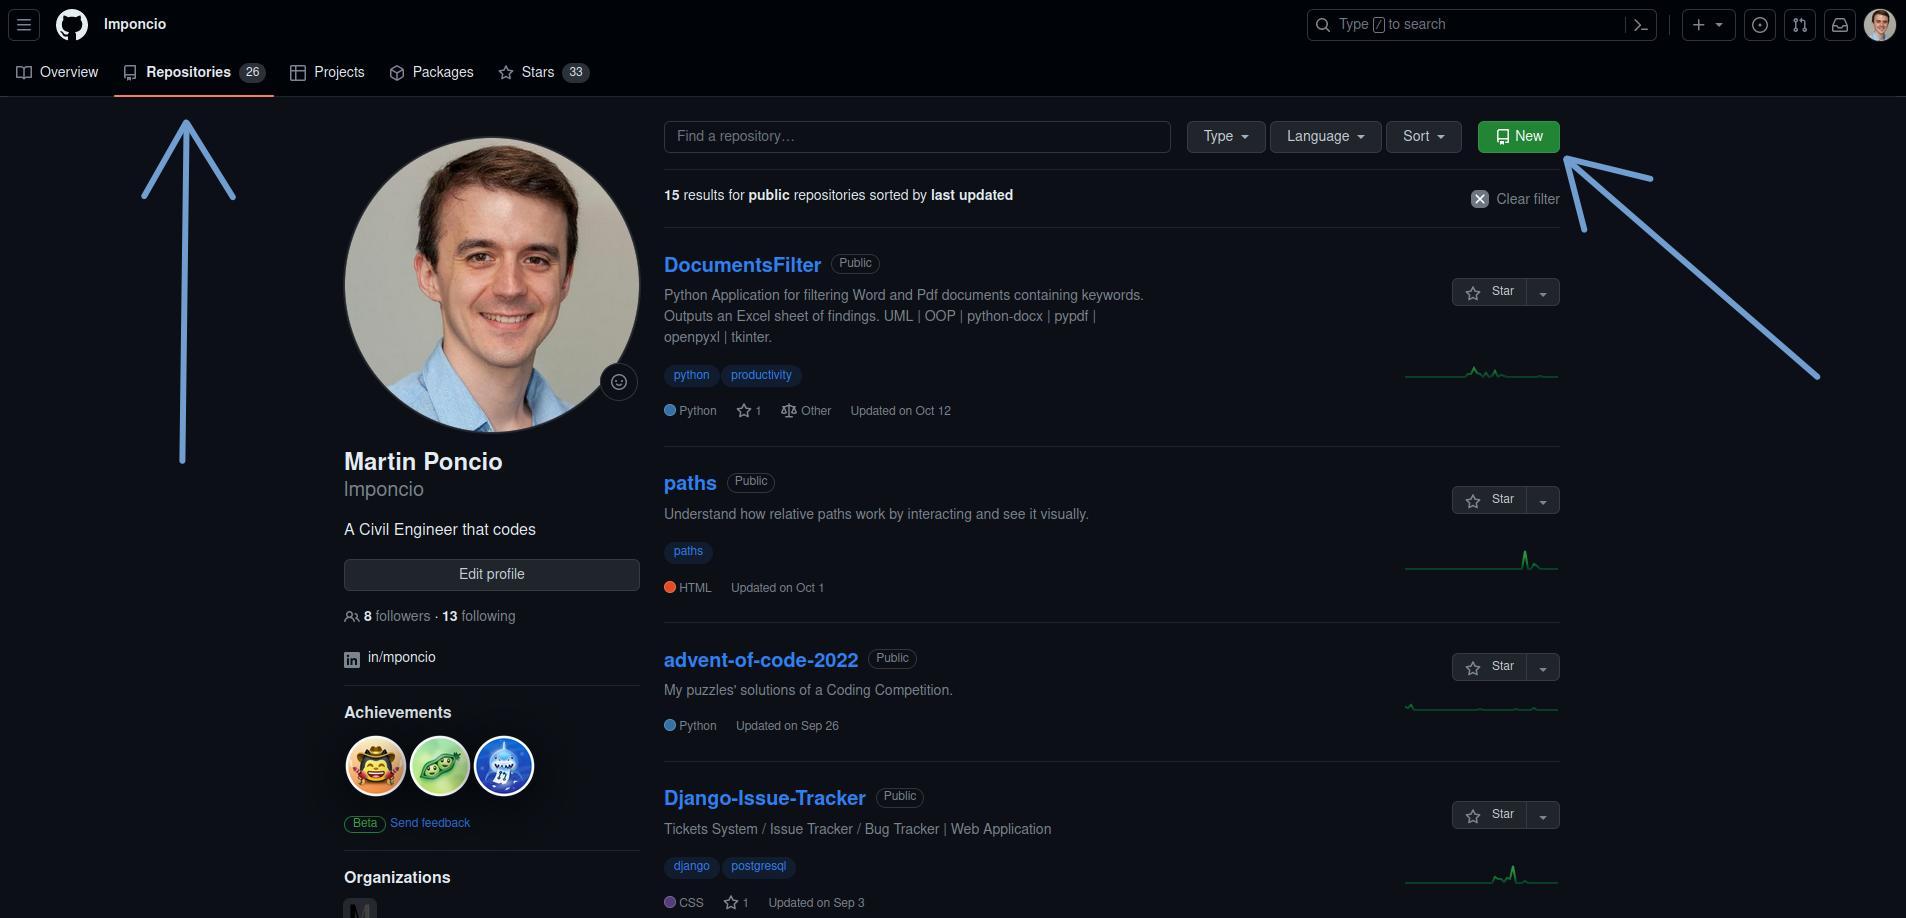
Start by going to Repositories > New
Now enter your repository name, fill in the rest of the options, and choose “Add a README file”. Proceed with the repository creation.
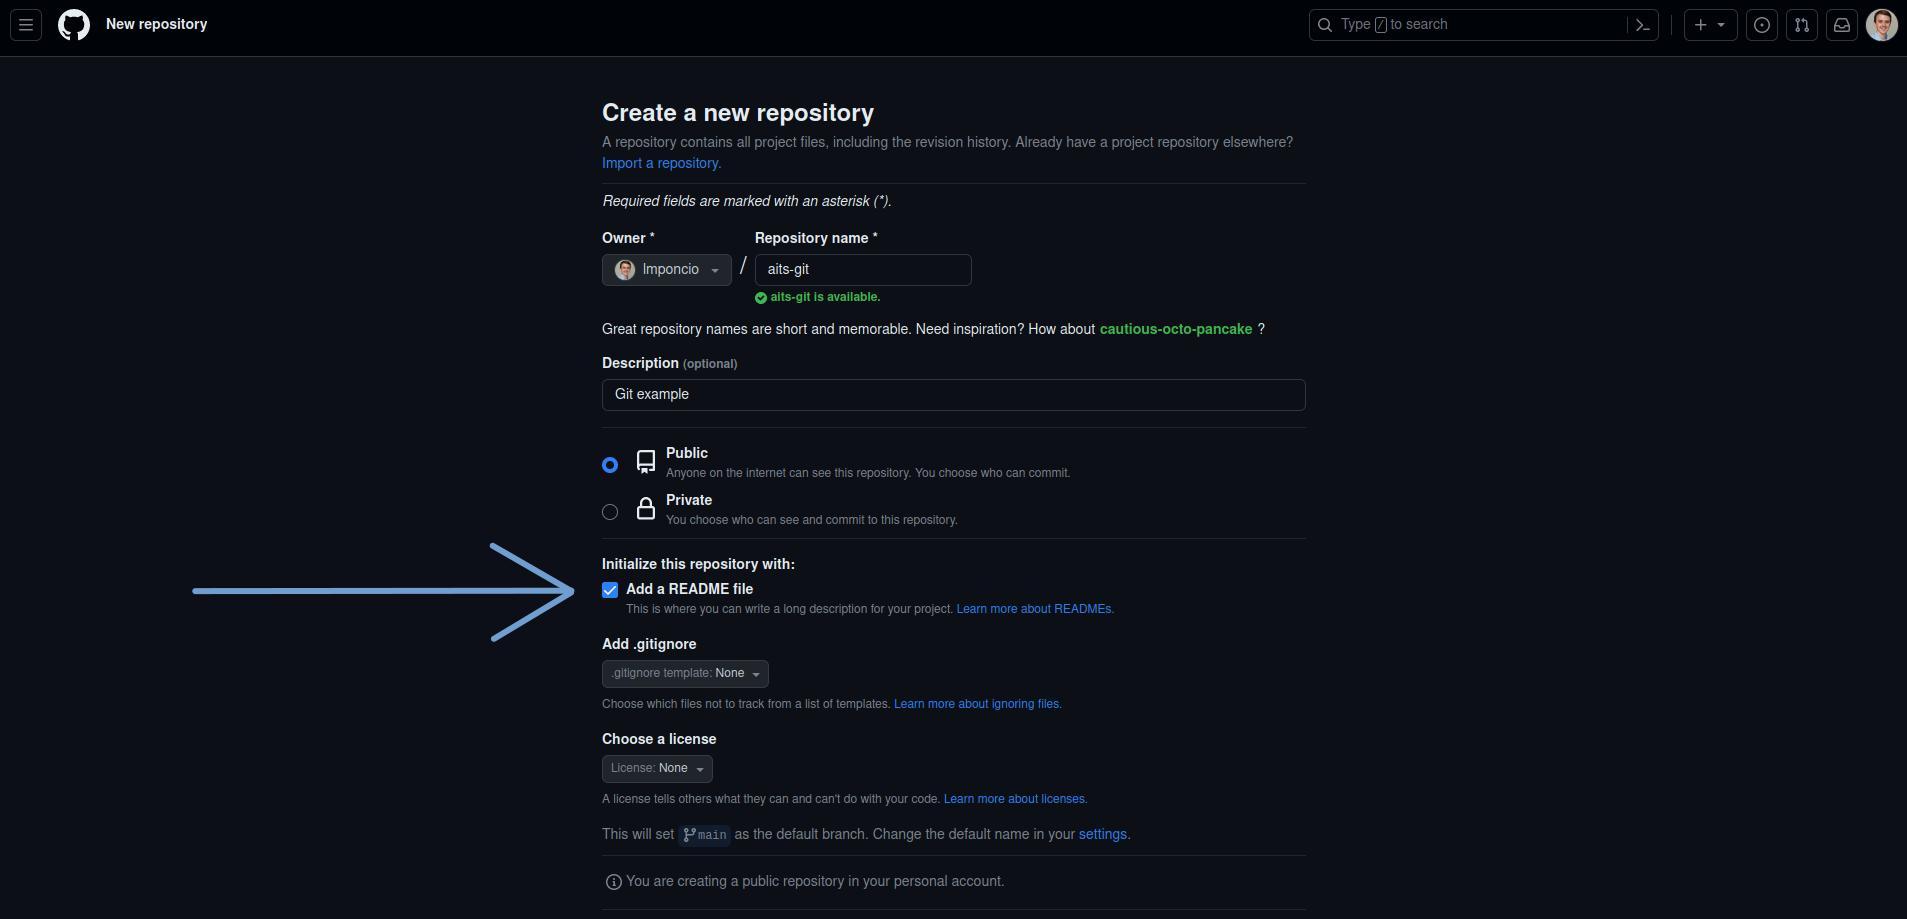
We are choosing for the repository to contain a README file because this makes GitHub initialize the repository and create a first commit containing that file. This simplifies the process a little bit.
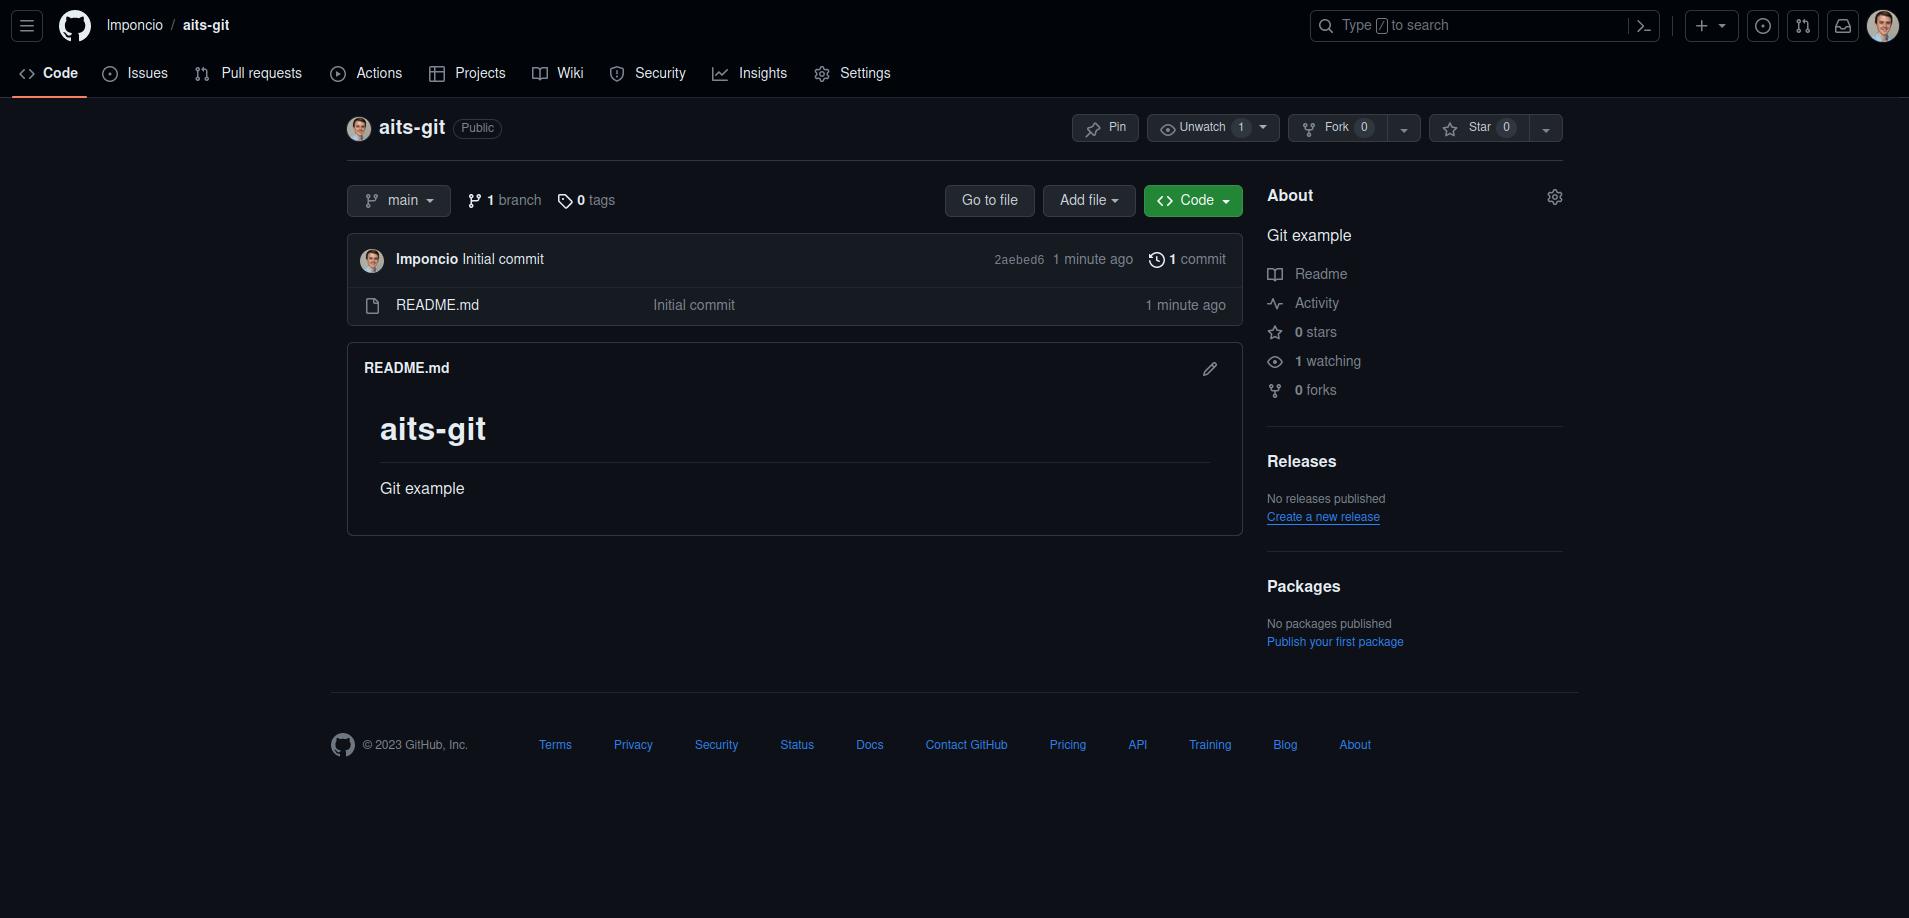
Now your repository has been created.
Cloning the repository
In this section we start using Git. We’ll use the git clone command to clone the repository to a folder in our computer. The command syntax looks like this:
$ git clone <repository-url> <destination-directory>
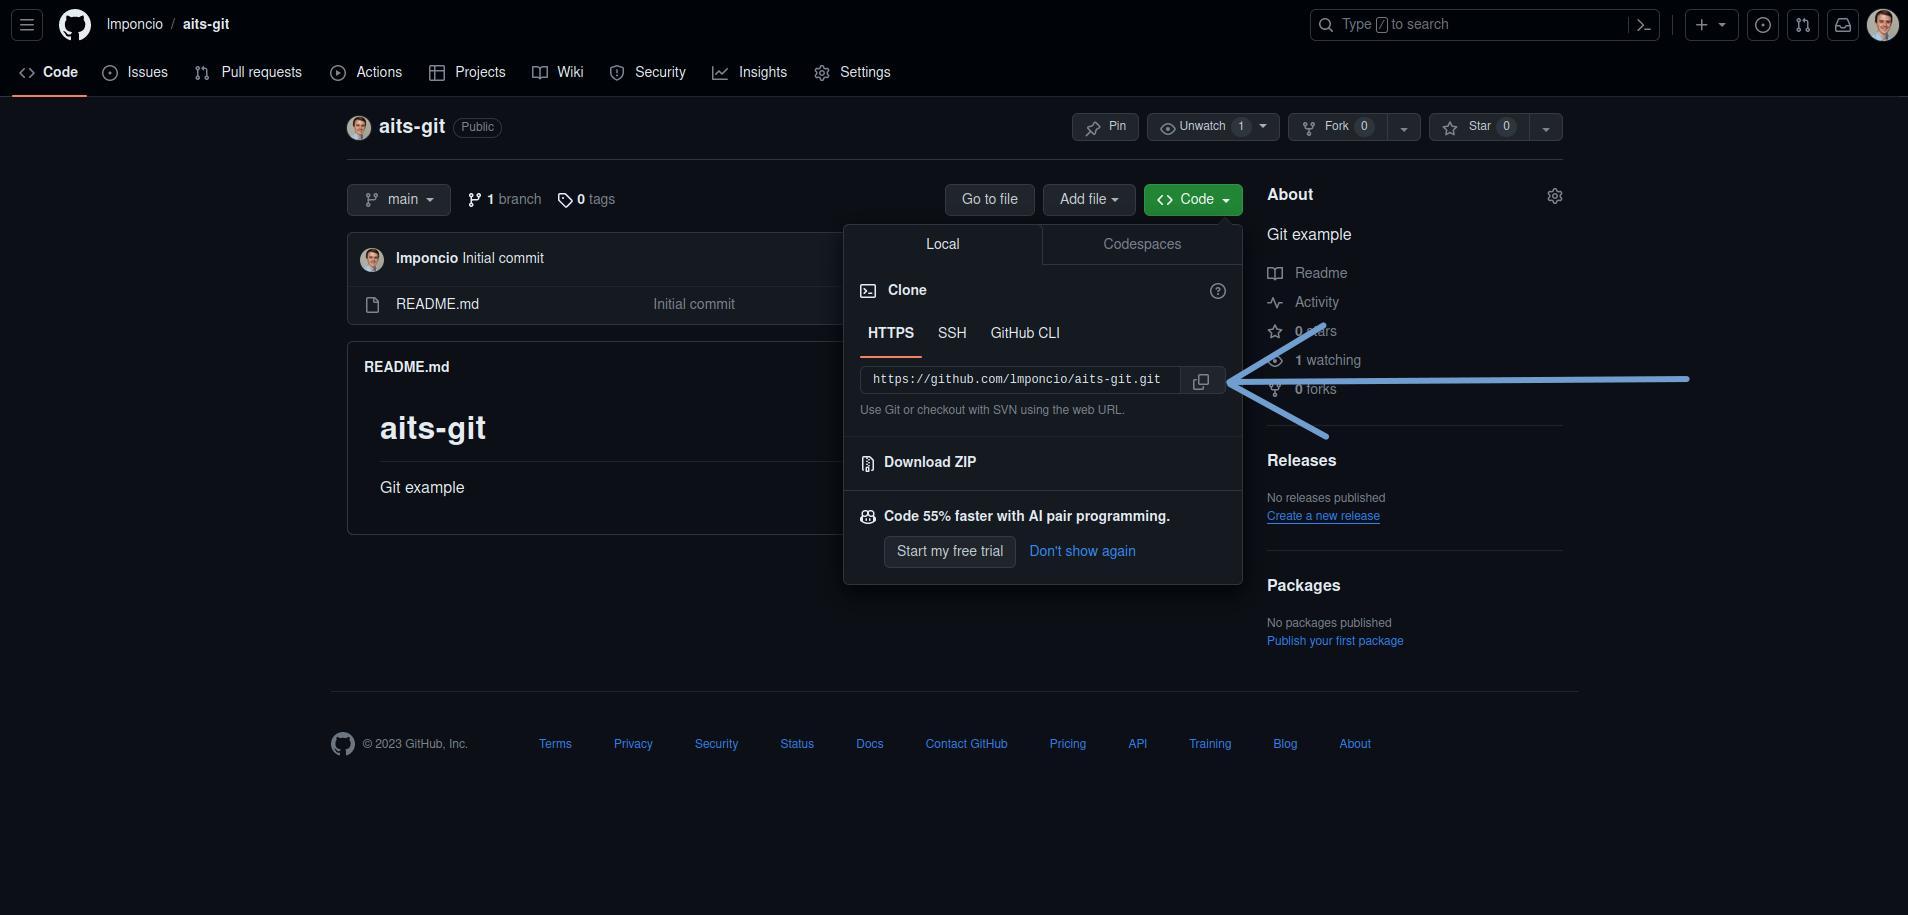
We’ll get the <repository-url> from the GitHub web app. Go to the top right where it reads “Code”, and copy the web URL by clicking on the button as indicated in the example below.
The <destination-directory> will be a new folder in our computer. Create a directory on your Desktop, open the terminal, and cd into it. Below I show the steps with the command line:
You can replace any step I describe in the command line that doesn’t start with
git,cdorpwdwith your way of performing that action without the command line (like creating folders or files with the mouse).
$ cd ~/Desktop
$ mkdir my_project
$ cd my_project/
To triple-check if you are in the correct directory, you can use the command pwd to print the working directory:
$ pwd
/home/user/Desktop/my_project
That’s the directory where we’ll clone the repository that is in GitHub. To do it, we’ll replace the <destination-directory> in the command for ., which means “here” or “working directory”. This is an example of how your git clone command will look like:
$ git clone https://github.com/lmponcio/aits-git.git .
Once you execute your clone command, the repository will be cloned into your working directory. You will be able to see the README.md in the folder you previously created.
From this point forward, remember all
gitcommands have to be executed in the folder where your cloned repository is - the folder where theREADME.mdis. If in doubt, use thepwdcommand to check if your current directory is the correct one, orlscommand to see if you can see theREADME.mdfile.
Adding changes
Your repository, as is now, doesn’t have any new changes. Check the status of it with git status:
$ git status
On branch main
Your branch is up to date with 'origin/main'.

nothing to commit, working tree clean
The default branch in this example is called
main, because of how my GitHub is configured. You could experience that your default branch ismasteror another name.
Let’s now apply a change, to the repository, and check the status of it again. I will create a new file:
$ echo "hello world" > newfile.txt
And I will add a new line to the README:
$ echo "newline" >> README.md
Feel free to apply those changes using the mouse and a text editor if you prefer.
Time to check our status again:
$ git status
On branch main
Your branch is up to date with 'origin/main'.

Changes not staged for commit:
  (use "git add <file>..." to update what will be committed)
  (use "git restore <file>..." to discard changes in working directory)
	modified:   README.md

Untracked files:
  (use "git add <file>..." to include in what will be committed)
	newfile.txt

no changes added to commit (use "git add" and/or "git commit -a")
Git is registering that some changes were made: it notices a new “Untracked” file newfile.txt, and changes applied to README.md. It suggests that I use the git add command to add these changes. I will use git add ., the . means to add everything (both changes, the new file, and the modification of the existing one).
$ git add .
Let’s see the status again:
$ git status
On branch main
Your branch is up to date with 'origin/main'.

Changes to be committed:
  (use "git restore --staged <file>..." to unstage)
	modified:   README.md
	new file:   newfile.txt
The new file newfile.txt and the change to README.md are now ready to be committed. We’ll do that in the next section.
Commit changes
Proceed with the following to command:
$ git commit -m "add newfile.txt and modify README"
[main 8808e83] add newfile.txt and modify README
 2 files changed, 2 insertions(+)
 create mode 100644 newfile.txt
The git commit command requires for us to provide a commit message - our message was "add newfile.txt and modify README". We were able to write our message in the same line thanks to the option -m.
Adding the commit message in this way is convenient when you are just starting to use Git. If instead, we used the git commit command without the -m option (simply git commit), a text editor will open in the terminal for us to provide the commit message. As a beginner, it’s common to have trouble using the text editor because it is not very intuitive to use (for example, you could get stuck trying to close it).
Because of the reasons explained above, as you start using Git, I recommend you to commit with the command git commit -m "<mymessage>".
It’s good to note that in the future you’ll need to write longer commit messages, so your team understands the changes you applied and why. In those cases, you’ll need to use the text editor.
Push to remote
After committing the changes, the next step is to push them (send them to the repository in GitHub). Before proceeding, let’s check the status of our repository:
$ git status
On branch main
Your branch is ahead of 'origin/main' by 1 commit.
  (use "git push" to publish your local commits)

nothing to commit, working tree clean
Something you might have noticed from every time we use git status is that the output talks about main and origin/main - two different things. We will stop here to understand these concepts.
We are working with files on our computer, in a folder we created on the Desktop. But we started this whole exercise by first creating a repository in the GitHub web app. The repository on GitHub is referred to as the “remote repository”, and by default, it is named origin. When we use git clone to copy the files to our computer, we create a “local repository” on our machine. This local repository is essentially a copy of the remote repository on GitHub. We create this local copy to work comfortably on our machine.
Reading again the git status output:
On branch main: we are on themainbranch of the local repository.Your branch is ahead of 'origin/main' by 1 commit.:origin/mainis the main branch in the remote repository. The changes we applied and committed are currently only in our local repository, and we need to usegit pushto send them to the remote repository in GitHub (calledorigin).
Now that we understand the difference between the local and remote repositories, and that we understand that origin is the name of the remote, let’s just push the changes:
$ git push origin main
Enumerating objects: 6, done.
Counting objects: 100% (6/6), done.
Delta compression using up to 12 threads
Compressing objects: 100% (2/2), done.
Writing objects: 100% (4/4), 346 bytes | 346.00 KiB/s, done.
Total 4 (delta 0), reused 0 (delta 0)
To https://github.com/lmponcio/aits-git.git
   2aebed6..8808e83  main -> main
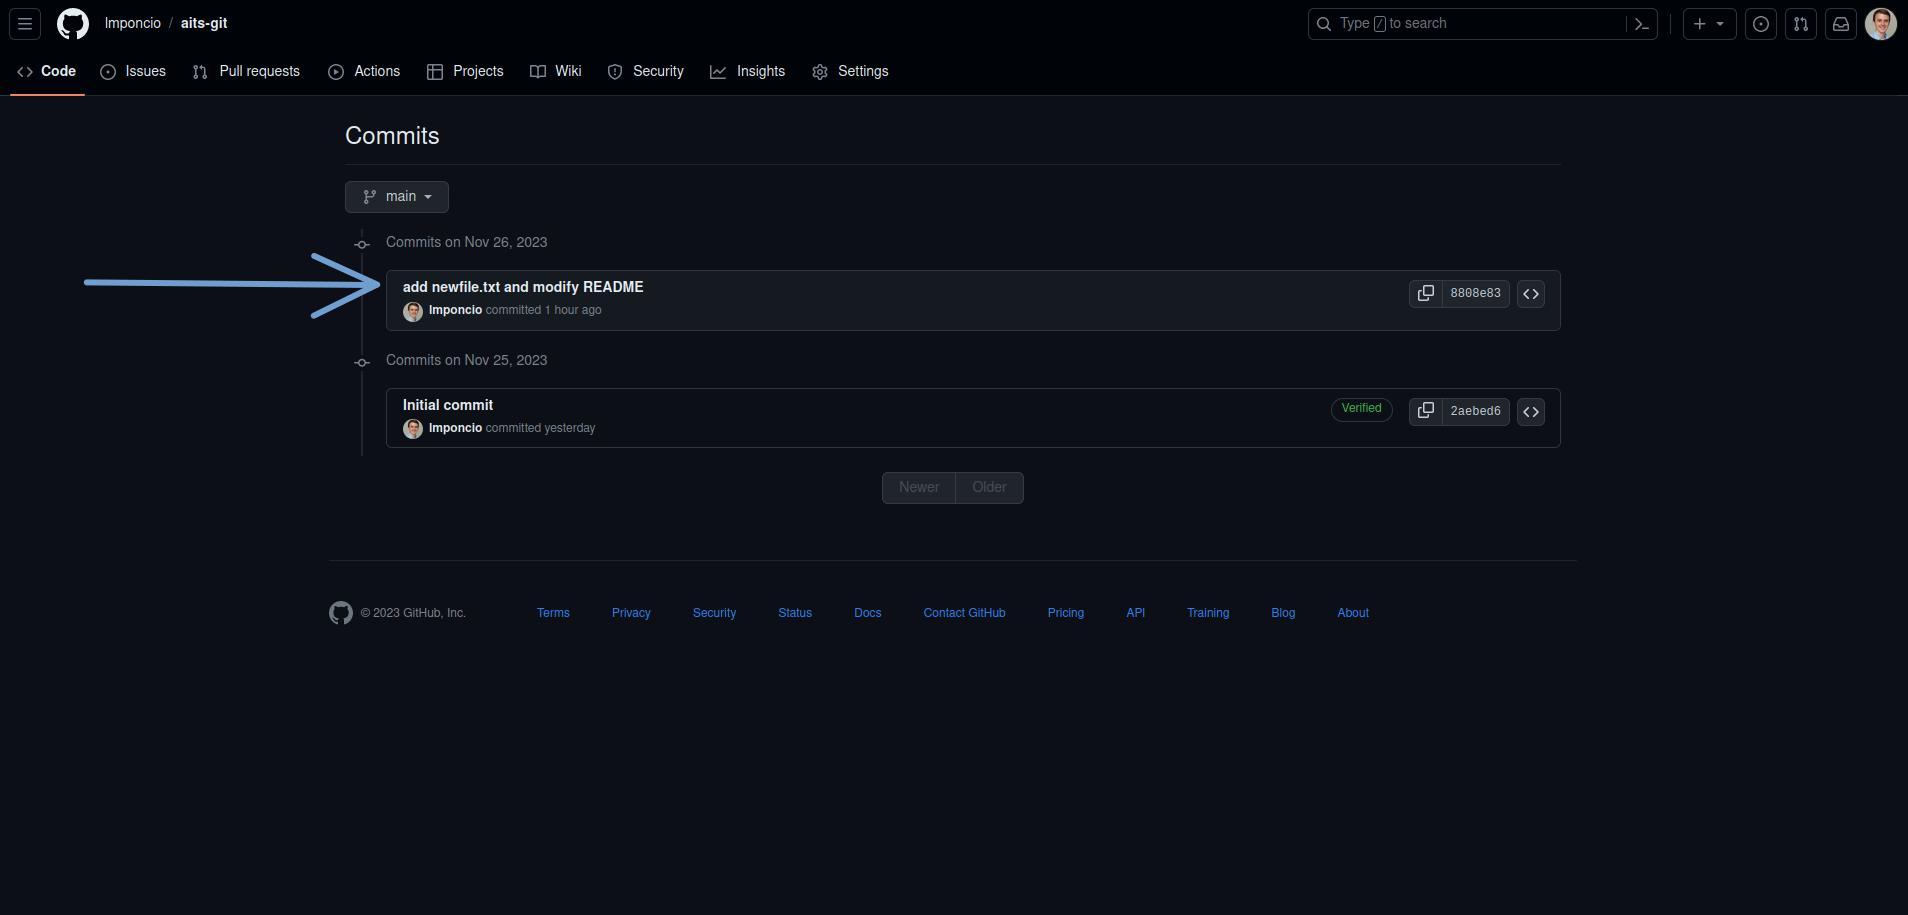
Let’s now go back to the GitHub web app and take a look at our repository. Click on “commits” (the text under the “Code” button - it’s easy to miss).
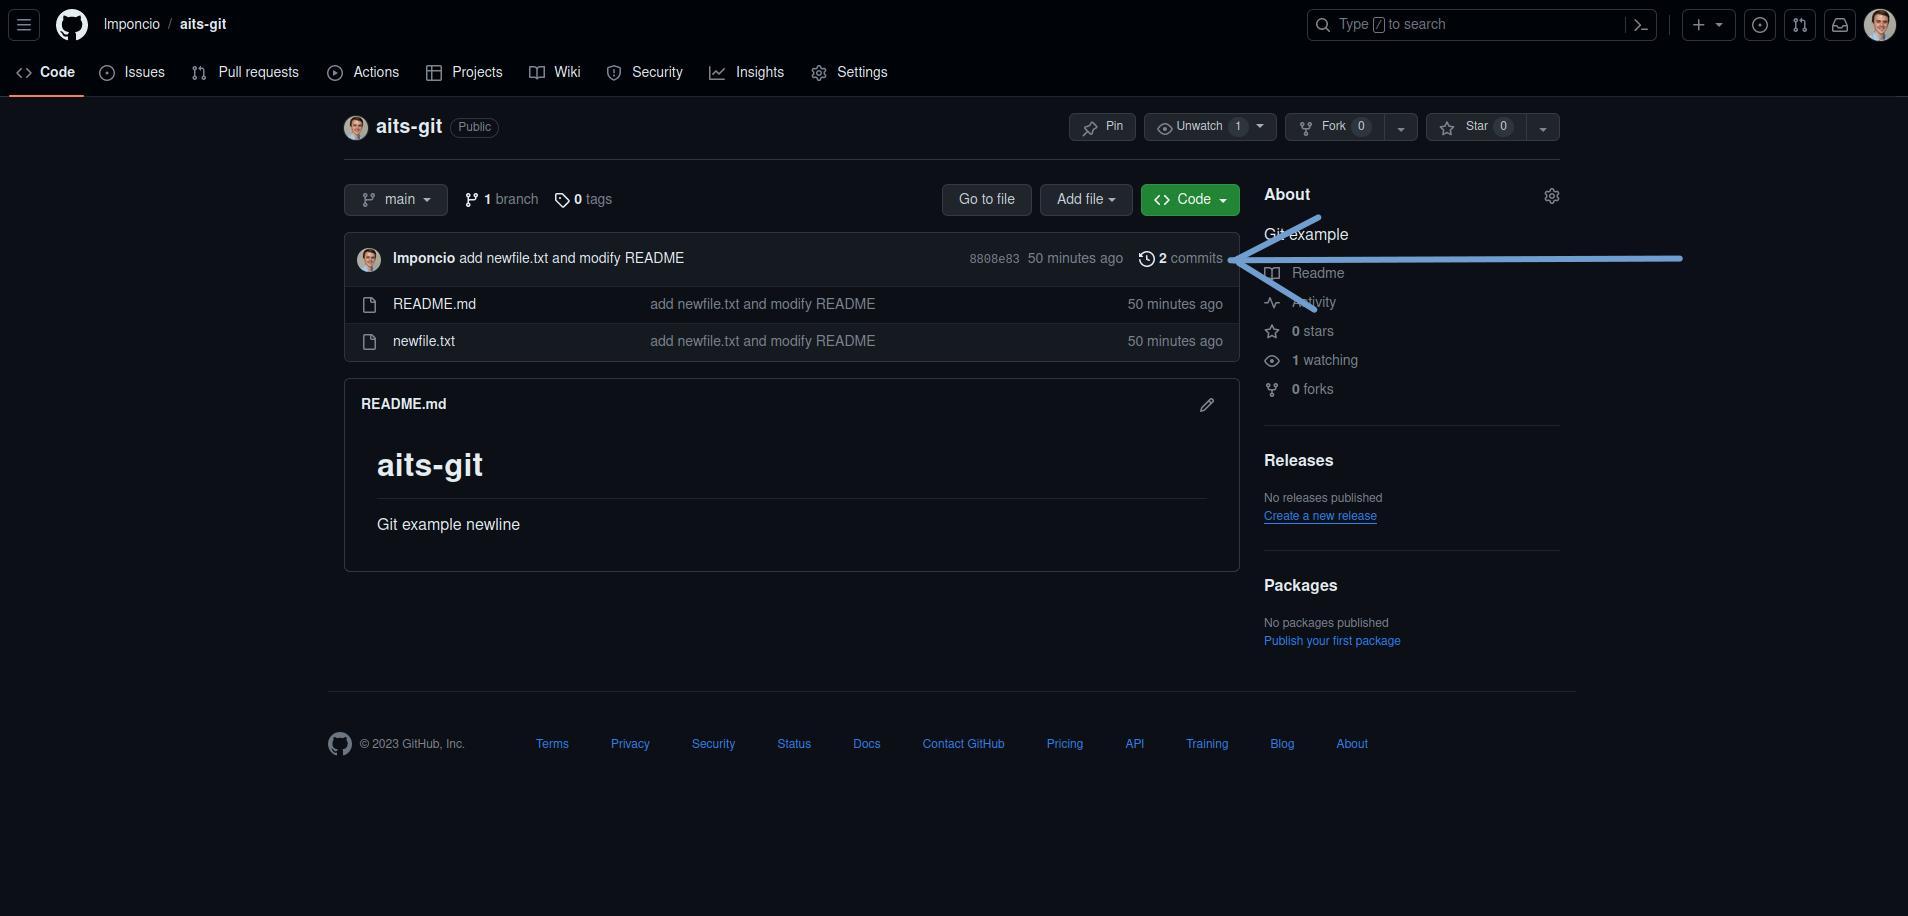
And there it is - the commit we had in our computer now is in the remote repository.
Rinse & Repeat
You now know how to create a repository, clone it into your machine, work on it (modify/create files), add changes, commit them, and push them. Now what? Well, now you are ready to keep advancing in your project, and from time to time push changes to the remote repository. If you still have doubts, try following these steps to push a new commit:
- Create a new file in your repository,
newfile2.txt. - Run the command
git add . - Run the command
git commit -m "add another file" - Run the command
git push origin main - Check in the GitHub web app if the remote repository reflects the new changes.